
Why Toilet Replacement Is Worth Getting Right
Toilet replacement is one of those home projects that sneaks up on you. One day the toilet is running constantly, or rocking slightly on the floor, or just looking worn out next to a freshly renovated bathroom. The next day you’re standing in the plumbing aisle trying to figure out what a rough-in measurement is.
Here is a quick overview of what most homeowners need to know:
- Average total cost: Pricing can vary depending on several factors, but most standard replacements fall into a moderate range when you account for the toilet unit, labor, and materials
- DIY or hire a pro: A straightforward swap is manageable for a handy homeowner, but complex situations call for a licensed plumber
- Time required: Most replacements take about two hours from start to finish
- Key measurement: Know your rough-in size (typically 12 inches) before buying a new toilet
- Biggest upgrade benefit: Switching to a water-efficient model can save the average household around $170 per year in water costs, according to the EPA
Beyond the basics, there are a handful of factors that quietly drive up the cost and complexity of a toilet replacement: the condition of your flange, the age of your shut-off valve, whether the subfloor has any water damage, and the type of toilet you choose. This guide walks through all of it so you can plan with confidence.
I’m JD Osman, and through my work in the home services industry at Quality Comfort Pros, I’ve seen how a well-planned toilet replacement can prevent costly water damage and improve long-term comfort in a home. Let’s break down everything you need to know.
Planning Your Toilet Replacement: Key Factors to Consider
Before you run out to the local home improvement store or call a professional plumbing team, a successful toilet replacement requires a bit of careful planning. It is easy to assume that all toilets are essentially the same, but choosing the wrong fixture can lead to installation headaches, return trips to the store, or even hidden leaks.
When you plan ahead, you can prioritize both long-term durability and water conservation. Modern fixtures are designed to use significantly less water than older models, which helps lower your utility bills while protecting our local water resources in Northern Michigan. Investing a little time in the planning phase ensures that your new fixture fits your bathroom layout perfectly and functions reliably for decades to come. Learn more about preventative plumbing to understand how taking proactive steps with your home’s pipes can save you from unexpected emergencies.
Understanding Rough-In Measurements
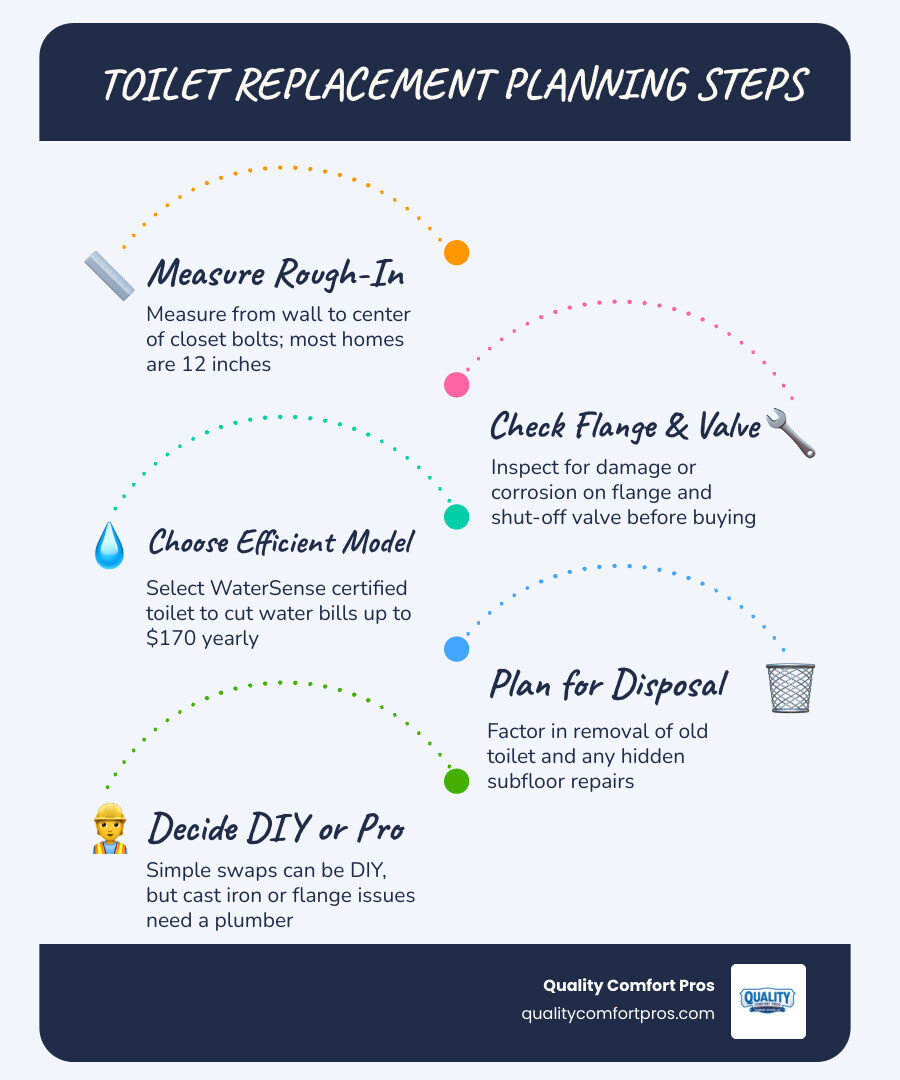
The absolute most critical step in planning your project is determining the correct rough-in size of your current toilet. The rough-in distance is the space between the finished wall behind the toilet and the center of the drainpipe on the floor.
If you get this measurement wrong, your new toilet tank may hit the wall, preventing installation, or leave an unsightly, massive gap behind the tank.

To find your rough-in size, grab a tape measure and follow these simple steps:
- Locate the plastic caps on the base of your toilet bowl that cover the closet bolts holding the fixture to the floor.
- Measure in a straight line from the finished wall directly behind the toilet to the center of one of those closet bolts.
- Do not measure from the baseboard or any decorative wall trim. Your measurement must start from the actual drywall or tiled wall surface.
In most residential homes across Gaylord, MI, and the surrounding areas, the standard rough-in measurement is 12 inches. However, older homes or custom bathroom layouts might feature a 10-inch or 14-inch rough-in. Knowing this exact number before shopping ensures you purchase a compatible fixture.
Choosing the Right Model for Your Toilet Replacement
Once you have your rough-in measurement, you can begin exploring different toilet designs and features. Modern fixtures offer a variety of options that balance comfort, aesthetics, and water efficiency.
One of the first decisions you will make is choosing between a round and an elongated toilet bowl:
- Round bowls: These typically measure about 16.5 inches from the seat bolt holes to the front edge. They are excellent space savers, making them ideal for small powder rooms or historic half-baths.
- Elongated bowls: Measuring around 18.5 inches, elongated bowls provide a more comfortable, ergonomic seating area. They require a bit more floor space, so make sure your bathroom door or vanity drawers will not hit the front of the bowl when opened.
You should also look for fixtures that carry the EPA WaterSense label. Toilets with a WaterSense certification are independently tested to ensure they use 1.28 gallons per flush or less while still providing powerful flushing performance. By replacing an outdated, high-volume toilet with a certified model, you can reduce your household’s water consumption dramatically. For more details on choosing high-efficiency fixtures, review the EPA WaterSense guidelines.
Cost Breakdown of New Toilet Installation
When budgeting for your bathroom upgrade, it is helpful to understand the various elements that contribute to the final price. The total investment for a new toilet setup includes the physical fixture, essential installation materials, and professional labor if you choose to hire a plumber.
Toilet Types and Design Variations
The design and features of the toilet you select will play a major role in your overall expenses. Let’s look at how the different styles compare:
| Toilet Type | Design Complexity | Material & Supply Cost Category | Best Suited For |
|---|---|---|---|
| Two-piece | Standard separate bowl and tank | Budget-friendly | Standard residential bathrooms, easy maintenance |
| One-piece | Integrated seamless design | Moderate to Premium | Modern bathrooms, easier cleaning, sleek look |
| Wall-mounted | Tank concealed inside the wall | Premium | Minimalist designs, maximizing floor space |
| Smart toilets | Built-in bidets, heated seats, auto-flush | Ultra-Premium | High-tech luxury bathroom renovations |
- Two-piece toilets: These are the most common and traditional models on the market. Because the tank and bowl are separate pieces bolted together, they are generally the most affordable to purchase and repair.
- One-piece toilets: These feature a seamless, integrated design. They are easier to wipe down because there is no gap between the tank and bowl where grime can collect, though they tend to be heavier and more expensive.
- Wall-mounted toilets: By mounting the bowl directly to the wall frame and hiding the tank inside the wall cavity, these systems create a highly modern, floating look. They require specialized framing and plumbing adjustments, which increases installation complexity.
- Smart toilets: Packed with advanced features like heated seats, automatic flushing, integrated bidets, and self-cleaning bowls, these high-end fixtures offer unmatched luxury but require access to an electrical outlet and a higher initial investment.
If you are planning a broader bathroom remodel or updating multiple fixtures, we can help coordinate the entire process. Explore our comprehensive plumbing services to see how we can assist with all your piping and fixture needs.

Potential Hidden Plumbing Expenses
Even with a straightforward toilet swap, unexpected issues can occasionally arise once the old fixture is lifted off the floor. These hidden complications can impact your overall timeline and budget.
- Flange repair: The toilet flange is the metal or plastic ring that connects the toilet to the waste pipe and secures it to the floor. If the old flange is cracked, rusted, or sitting too low below the finished flooring, it must be repaired or extended to prevent leaks.
- Subfloor damage: If your old toilet had a slow, unnoticed leak around its base, water may have seeped into the surrounding wooden subfloor. Rotted wood must be cut out and replaced to ensure the new toilet has a stable, level surface to sit on.
- Shut-off valves: The small valve on the wall behind your toilet is used to turn off the water supply. Over time, these valves can become seized or start dripping when turned. Replacing an old, corroded multi-turn valve with a reliable quarter-turn ball valve is highly recommended during a replacement.
Catching these issues early is key to preventing long-term structural damage to your home. If you suspect an active leak or soft spots on your bathroom floor, reach out for our professional leak repair services to address the root of the problem before installing your new fixture.
How to Install a Toilet: A Step-by-Step Guide
If you have some basic DIY experience and a free afternoon, replacing a toilet is a rewarding home project. However, plumbing tasks require patience and close attention to detail. A single loose connection can lead to slow, hidden leaks that damage your ceiling or floor joists.
Before you begin, always prioritize safety. Wear heavy-duty rubber gloves and safety glasses to protect yourself from bacteria and cleaning chemicals. Additionally, be aware of sewer gas. Once you lift the old toilet off the floor, the open drain pipe will allow sewer odors and gases to escape into your home. Keep an old rag nearby to temporarily stuff into the open drain line while you work on cleaning the area.
Tools and Materials Checklist
Having all your tools and supplies gathered beforehand will prevent you from having to run to the hardware store with a half-disassembled bathroom.
Make sure you have the following items ready:
- New toilet (bowl, tank, and seat)
- Premium wax ring (or a non-wax rubber toilet seal)
- Solid brass closet bolts (5/16-inch bolts are recommended)
- Braided stainless steel water supply line
- Adjustable wrench
- Putty knife or plastic scraper
- Level
- Hacksaw (for trimming long bolts)
- Silicone caulk and caulk gun
- Sponge, bucket, and old towels
- Rubber gloves and disinfectant cleaner
Step-by-Step DIY Toilet Replacement Guide
Follow these steps carefully to ensure a secure, watertight installation:
- Turn off the water supply: Locate the shut-off valve on the wall behind the toilet and turn it clockwise until it stops. Flush the toilet and hold the handle down to drain as much water as possible from the tank and bowl.
- Remove remaining water: Use a sponge or a wet-dry vacuum to remove the small amount of water left at the bottom of the tank and the bowl. This prevents messy spills when you lift the fixture.
- Disconnect the water supply line: Use an adjustable wrench to disconnect the supply line from the bottom of the toilet tank. Keep a bucket underneath to catch any residual drips.
- Unbolt the toilet: Remove the plastic decorative caps at the base of the toilet. Use your wrench to unscrew the nuts from the closet bolts. If the bolts spin, hold them in place with pliers while turning the nut.
- Remove the old toilet: Gently rock the toilet from side to side to break the old wax seal. Lift the toilet straight up, keeping your back straight and lifting with your legs. Place the old toilet on a piece of cardboard or trash bag to protect your flooring.
- Seal the drain: Immediately stuff a clean rag into the open floor drain to block sewer gases and prevent tools from accidentally falling down the pipe.
- Clean the flange: Use a putty knife or scraper to scrape away all the old wax from the floor flange. Clean the area with disinfectant. Inspect the flange for cracks or signs of corrosion.
- Prep the new toilet: Install the new closet bolts into the slots on the flange, pointing straight up. Press the new wax ring firmly onto the bottom outlet (horn) of the new toilet bowl, or place it directly onto the clean flange.
- Set the new bowl: Carefully remove the rag from the drain. Lift the new toilet bowl and align the bottom holes with the upright closet bolts. Lower the bowl straight down onto the flange. Press down firmly with your body weight to compress the wax ring.
- Secure the base: Place the plastic washers and metal nuts onto the closet bolts. Tighten them hand-tight, then use a wrench to snug them up. Alternating sides as you tighten helps keep the toilet level. Do not overtighten, as this can easily crack the porcelain.
- Install the tank: If you have a two-piece toilet, place the large rubber tank-to-bowl gasket over the opening on the bottom of the tank. Set the tank onto the bowl, aligning the bolt holes. Tighten the tank bolts evenly until the tank sits snug against the bowl.
- Connect and test: Attach your new braided stainless steel supply line to the fill valve on the bottom of the tank and to the wall shut-off valve. Turn the water supply back on slowly and check for leaks around all connections. Flush the toilet several times while inspecting the base for any signs of water.
For a more visual walkthrough and additional troubleshooting tips, you can read through the detailed DIY toilet replacement steps.
When to Hire a Professional Plumber
While a basic toilet swap is a classic weekend DIY project, there are several situations where it is much safer and more efficient to call in a licensed plumber. Plumbing systems in older Northern Michigan homes can be delicate, and small mistakes can quickly escalate into costly water damage.
You should consider hiring a professional if you encounter any of the following challenges:
- Cast-iron pipes: Older homes often feature cast-iron waste lines. These pipes are incredibly heavy, brittle, and prone to severe corrosion, requiring specialized tools and techniques to handle safely.
- Rotted subfloors: If lifting your old toilet reveals soft, water-damaged wood around the drain, the flooring must be structurally repaired before a new toilet can be safely mounted.
- A broken or sunken flange: If the floor flange is cracked below the floor level, installing a standard wax ring will not create a reliable seal. A professional can properly repair or extend the flange to match your finished flooring height.
- Moving the toilet location: If you are remodeling your bathroom and want to move the toilet to a different wall, this requires rerouting the main waste stack and vent lines, which must comply with local building codes.
Our team at Quality Comfort Pros is always ready to help you complete your bathroom upgrades safely and professionally. If you run into unexpected trouble during your installation or simply want the peace of mind that comes with expert service, you can easily schedule a professional toilet repair or replacement with our local team. If a leak starts causing immediate damage, do not hesitate to contact us for emergency plumbing assistance right away.
Frequently Asked Questions About Toilet Replacement
How much does a standard toilet replacement cost in 2026?
The total investment for a toilet replacement can vary depending on several factors, including the model of the toilet you select, the complexity of your bathroom layout, and whether any repairs are needed for your existing plumbing. Generally, a straightforward swap using standard materials falls within a highly accessible, moderate price range.
Can I replace a toilet myself or should I hire a plumber?
Many handy homeowners can successfully replace a toilet themselves if the existing flange and shut-off valve are in good condition. However, if you are dealing with older cast-iron piping, a damaged floor flange, or signs of water damage in your subfloor, hiring a professional plumber is the best way to prevent future leaks and ensure the job is done to local plumbing codes.
What is a rough-in measurement and why does it matter?
A rough-in measurement is the distance from the finished wall behind the toilet to the center of the floor drain. This measurement is crucial because toilets are built to match specific rough-in sizes, with 12 inches being the industry standard. Purchasing a toilet with the wrong rough-in size will prevent it from fitting properly against your wall.
How long does it take to replace a toilet?
For a professional plumber, a standard toilet swap typically takes between one and two hours. If you are attempting the project as a DIY task, it is wise to set aside three to four hours to ensure you can clean the flange, level the bowl, and test all connections thoroughly without rushing.
What are the signs that my toilet needs to be replaced?
Common signs that it is time for a replacement include visible cracks in the porcelain bowl or tank, a toilet that wobbles or rocks on the floor, frequent clogs, constant running that cannot be fixed with a simple rebuild kit, or a desire to upgrade to a modern, water-efficient model to lower your utility bills.
Do I need to replace the wax ring when installing a new toilet?
Yes, you must always use a brand-new wax ring or rubber seal whenever you install a toilet. Once a wax ring is compressed during installation, it cannot be reused. Attempting to reinstall a toilet on an old wax ring will almost always result in sewer gas leaks and water damage.
What is the difference between a round and an elongated toilet bowl?
Round toilet bowls are shorter and circular, making them ideal for small bathrooms where saving floor space is a priority. Elongated bowls are oval-shaped and extend about two inches further forward, offering a more comfortable, natural seating option for larger bathrooms.
How do WaterSense toilets save money on water bills?
WaterSense-certified toilets are engineered to use no more than 1.28 gallons of water per flush, which is at least 20 percent less water than standard older models. Over the course of a year, this reduction in water use can save a typical family a significant amount of money on their utility bills.
What should I do if my toilet flange is damaged or too low?
If your toilet flange is cracked, you can use a specialized metal repair ring to reinforce it. If the flange sits too far below your finished floor level, you can install flange extenders along with an extra-thick wax ring to build up the height and ensure a watertight seal.
Can a running toilet indicate that it is time for a replacement?
A running toilet is usually caused by a worn-out flapper or fill valve inside the tank, which can easily be repaired with a cheap rebuild kit. However, if the internal parts are constantly failing, the porcelain tank is cracked, or the toilet is an older, water-wasting model, replacing the entire fixture is often the most cost-effective long-term solution.
What is the average cost to replace a toilet in 2026?
For a standard like-for-like replacement where the new toilet connects to the same drain and water line, most homeowners pay between $350 and $800 total, with the most common outcome landing around $375 to $500. That covers the toilet itself, labor, a new wax ring, and supply line connection. Costs climb above $800 when the toilet is a premium model, when the flange is damaged, or when the shutoff valve needs replacement at the same time.
What hidden costs should I budget for before the plumber arrives?
The three most common surprises found once the old toilet comes off are a cracked or corroded flange ($75 to $450 additional to repair), a shutoff valve that will not fully close ($50 to $150 to replace), and subfloor rot from a slow leak that went unnoticed ($200 to $1,000 depending on how far the damage spread). None of these are visible until the old toilet is removed, so if your toilet is old or has ever rocked or leaked at the base, budget for at least one of them.
Is it cheaper to repair a toilet or replace it?
Minor repairs like a flapper, fill valve, or wax ring typically run $50 to $200 and are worth doing on a toilet that is otherwise in good shape. If the toilet is more than 15 to 20 years old, cracks in the porcelain, a history of repeated repairs, or a non-ADA height that is hard to use, replacement tends to be the better long-term value. A plumber can assess which direction makes sense after a quick look.
Can I buy the toilet myself and just pay for labor?
Yes, and many homeowners do this to control the style and budget for the unit itself. The tradeoff is that if the toilet arrives with a defect or a missing part, that responsibility falls on you rather than the plumber. If you go this route, confirm the rough-in measurement before purchasing. Standard is 12 inches from the wall to the center of the drain, but older homes sometimes have 10 or 14 inch rough-ins, and buying the wrong toilet creates a return trip and delays the job.
What is a toilet flange and why does it affect replacement cost?
The flange is the metal or plastic ring that connects the base of the toilet to the waste pipe and anchors it to the floor. It has to sit at the right height relative to the finished floor for the wax ring to seal properly. If the flange is cracked, corroded, or sitting too low, it needs to be repaired or extended before the new toilet goes in. A simple repair adds $75 to $150 to the job. A full flange replacement, especially in cast iron, can add $200 to $450.
How long does a professional toilet replacement take?
A straightforward swap with no complications typically takes one to two hours. If a flange repair, subfloor work, or shutoff valve replacement is needed, add another hour or two depending on what is found. Same-day service is available in most cases when you call Quality Comfort Pros at (989) 778-9270.
Conclusion
Upgrading your bathroom with a new toilet is a fantastic way to improve your home’s comfort, modernize your decor, and reduce your monthly water bills. Whether you decide to tackle the installation yourself or leave the heavy lifting to the experts, taking the time to measure your rough-in space and select a water-efficient model will pay off for years to come.
At Quality Comfort Pros, we have spent over 28 years providing reliable, family-owned home solutions across Gaylord, MI, and the surrounding Northern Michigan communities. We understand the unique plumbing needs of our local area, from winterizing vacation cottages to upgrading historic homes with modern, efficient fixtures. Our experienced team is fully compatible with all major brands, ensuring you get a seamless, worry-free installation every single time.
If you are ready to upgrade your bathroom or need assistance with a tricky installation, Quality Comfort Pros is here to help. Contact us today for an expert toilet replacement and let our professional team handle the dirty work for you!