
Understanding Code Requirements and Drain Line Fundamentals
To complete a water softener drain line installation, connect 1/2-inch inside diameter tubing from the control valve drain port to an approved receptor like a dedicated standpipe, utility sink, or floor drain. Ensure the line stays under 30 feet in total length, rises no higher than 8 feet vertically, maintains a 1/4-inch per foot downward slope, and terminates with a minimum 1.5-inch air gap above the drain rim to prevent backflow.
Understanding plumbing codes and local health requirements is essential before running discharge pipes. When a softener cleans itself during regeneration, it flushes out concentrated salty brine along with calcium and magnesium. Plumbing regulations require that this waste stream travels through an indirect waste pipe rather than a sealed, direct connection.
The core reason for this rule is cross-connection control. If a discharge hose is shoved directly into a sewer pipe or drain hole without a break, any sewage backup in the household plumbing could travel backward into the water softener. That backflow would contaminate the resin bed and enter your household drinking water supply. Adhering to proper plumbing practices safeguards your water quality while ensuring foul sewer gases cannot enter your living spaces.
Air Gap Regulations and Cross-Connection Prevention
The most vital safety feature of any discharge system is the physical air gap. An air gap is an unobstructed vertical space of open air between the end of the water softener discharge line and the flood level rim of the receiving drain receptor. Under standard residential plumbing codes, the vertical air gap must be at least 1.5 inches above the drain opening, or at least two times the effective diameter of the drain line, whichever measurement is greater.
This physical gap makes back-siphoning physically impossible. Even if a basement drain clogs and wastewater rises to the rim of the fixture, the gap prevents dirty water from reaching the discharge hose opening. Using certified air gap fittings or properly mounting the discharge line above the fixture rim satisfies municipal requirements and meets the standards defined by environmental agencies like the EPA regarding cross-connection prevention and safe drinking water management.
Maximum Length, Slope, and Vertical Rise Limitations
Water softeners do not rely on high-pressure utility pumps to empty their tanks; they rely on internal valve injector pressure and domestic water pressure to lift and push waste fluids. Because of this hydraulic limitation, you must keep the drain line within specific physical boundaries to prevent excessive head loss and back-pressure.
- Maximum continuous length: The total run should not exceed 30 feet from the softener control valve to the discharge receptor.
- Maximum vertical rise: The line must not climb higher than 8 feet above the floor where the softener sits.
- Minimum downward slope: Any horizontal stretch must maintain a downward pitch of at least 1/4 inch per foot toward the final drain.
- Support spacing: Secure the tubing with pipe straps or conduit clamps every 4 feet to prevent sagging, dipping, or dynamic movement when high-velocity water pulses through the line.
If the discharge path is too long or climbs too high, the internal valve mechanism cannot generate enough force to clear the brine solution. This can leave standing water in the brine tank, disrupt regeneration cycles, and cause hard water to bleed back into the household fixtures.
Approved Discharge Locations for Regeneration Waste
During the backwash and fast-rinse stages of regeneration, softeners move water at flow rates between 3 and 7 gallons per minute (GPM). Your chosen discharge receptor must handle this continuous flow without splashing or overflowing onto the floor. Finding the right connection point depends on your home layout, plumbing stack locations, and whether you are updating old lines through complete pipe replacement.
Laundry Sinks, Floor Drains, and Sump Basins
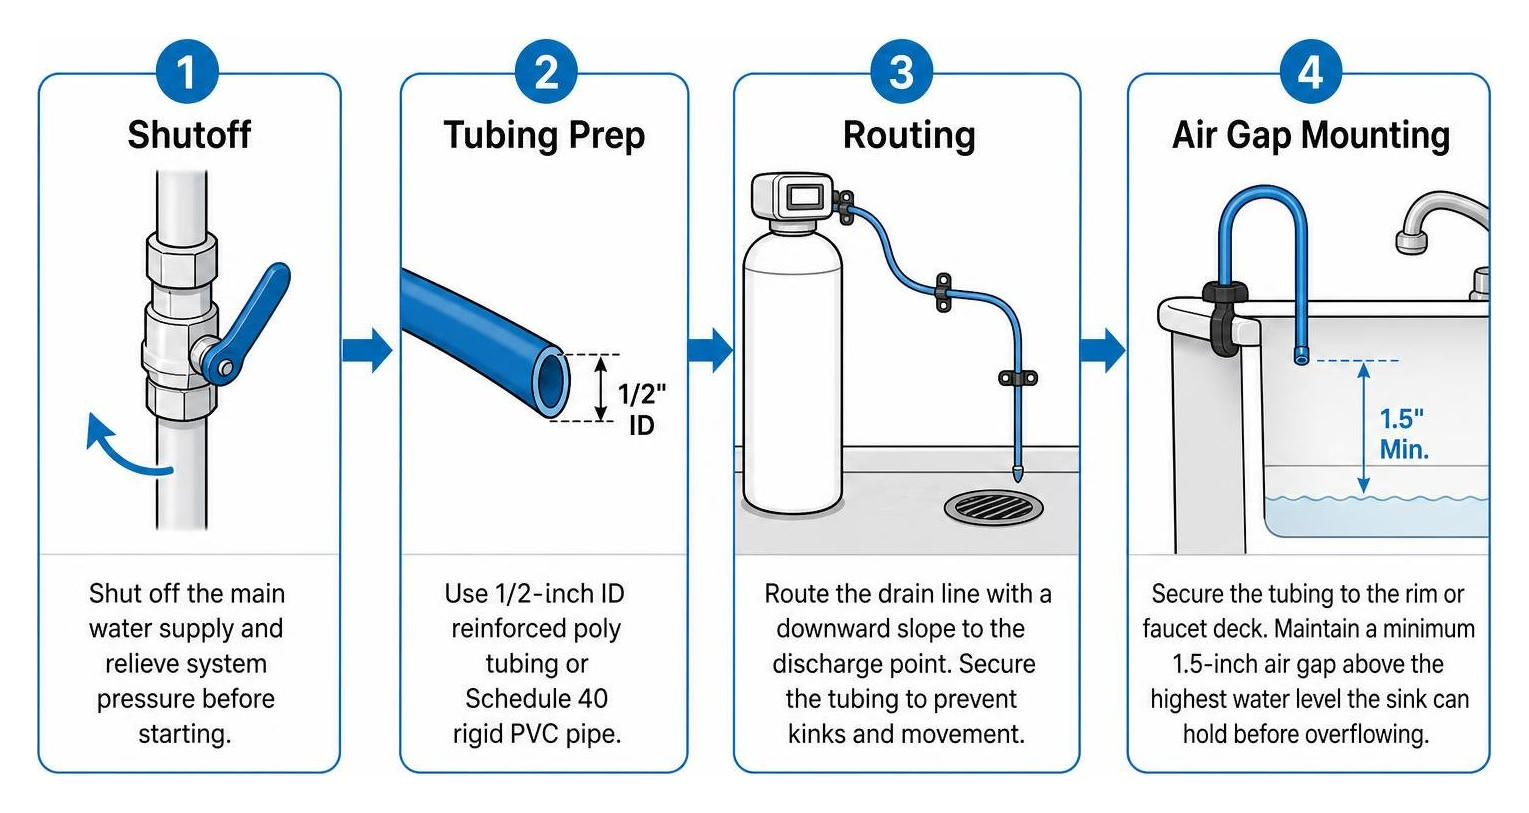
Residential homes often utilize utility sinks or basement floor drains as simple discharge destinations. When connecting to a laundry sink, the discharge tubing must be clamped securely to the rim or faucet deck, maintaining a 1.5-inch gap above the highest water level the sink can hold before overflowing. Utility sinks are great for catching loose sediment and allowing homeowners to observe the clarity of the backwash water.
Basement floor drains are another reliable option. The discharge line should terminate directly over the drain grate with an approved bracket that holds the tube rigidly in place.
Sump pump basins can also accept softener drainage if other sewer connections are out of reach. Because softener discharge carries concentrated sodium or potassium chloride brine, standard cast-iron sump pumps can corrode over time. If using a sump basin, choose a corrosion-resistant thermoplastic or stainless steel pump with a reliable check valve to pump the brine safely outside or into your primary waste stack.
Dedicated Standpipes and Outdoor Drainage Systems
A dedicated 2-inch diameter plumbing standpipe fitted with a P-trap and tied into a vented sanitary line provides a clean, permanent drain solution. Standpipes prevent visible splashes, keep basement utility spaces organized, and offer an ideal platform for modular air gap adapters.
| Discharge Method | Code Compliance | Pros | Cons / Requirements |
|---|---|---|---|
| Dedicated Standpipe | High (Code Preferred) | Clean appearance, no open splashes, hard-plumbed reliability | Requires 2″ pipe, dedicated P-trap, and proper venting |
| Laundry Utility Sink | High (When Air Gapped) | Easy visual inspection, simple clamp installation | Can stain sink over time; must keep tub clear of laundry |
| Basement Floor Drain | Moderate to High | Low lift requirement, gravity-assisted flow | Risk of hose shifting if not bracketed; possible floor spray |
| Outdoor Dry Well | Varies by Local Code | Keeps sodium loads out of municipal or septic setups | Risk of freezing in Northern Michigan winters; requires excavation |
Outdoor discharge options like dry wells or French drains can work in mild climates, but they face strict environmental regulations and frost concerns in Northern Michigan. Discharging salty brine directly onto residential soil or landscaping can harm vegetation, kill turf grass, and alter soil chemistry. Connecting indoors to an approved municipal drain or code-compliant septic system is almost always the safer choice.
Step-by-Step Water Softener Drain Line Installation Process
Setting up your softener’s drainage requires careful planning, standard plumbing tools, and attention to detail. Taking things one step at a time ensures a leak-free setup that passes plumbing inspections and operates reliably for years to come. If you are completing a full system update, professional water softener installation ensures all bypass valves, supply lines, and electrical connections match factory specifications.
Essential Tools and Sizing for Water Softener Drain Line Installation
Before starting, gather the appropriate tools and materials:
- Tubing: 1/2-inch inside diameter (ID) reinforced poly tubing or Schedule 40 rigid PVC pipe.
- Fittings: Corrosion-resistant compression fittings, brass adaptors, or barbed connectors rated for drinking water and water treatment equipment under the NSF/ANSI 61 standard.
- Hardware: Stainless steel worm-drive hose clamps, mounting brackets, and plastic conduit J-hooks.
- Tools: Tubing cutter or PVC hand saw, torpedo level, tape measure, adjustable wrenches, and a cordless drill with driver bits.
Always avoid thin, clear vinyl tubing for long, permanent runs. Flexible vinyl can soften under warmth, sag between brackets, and eventually kink or collapse under intermittent suction, causing line restrictions.
If the project expands beyond a simple drain hose route, Quality Comfort Pros can help with related plumbing needs such as water softener repair when brine draw problems, valve errors, or repeated regeneration issues point to a larger system concern.
Routing, Securing, and Plumbing the Discharge Tube
Follow these fundamental steps to complete the physical line run:
- Shut Off Water Supply: Turn off the main supply valve to the home and open a low fixture to relieve line pressure. Shift the softener bypass valve to the bypass position.
- Attach the Valve Drain Fitting: Connect your 1/2-inch ID tubing to the drain port barb on the softener control head. Slide a stainless steel hose clamp over the connection and tighten it until snug.
- Route the Tubing Overhead or Along Walls: Run the line upward toward the floor joists, keeping the total vertical rise under 8 feet. Avoid sharp 90-degree bends by maintaining broad, sweeping curves.
- Fasten the Line: Anchor the tubing along the framing every 4 feet using plastic pipe straps. Maintain a continuous 1/4-inch per foot slope toward the discharge point once the line begins its horizontal run.
- Install the Air Gap Fitting: Mount a code-compliant air gap fitting onto your standpipe, laundry tub wall, or floor drain bracket. Insert the discharge tube into the top inlet of the air gap device, ensuring the minimum 1.5-inch air space remains open.
- Route the Brine Tank Overflow Line: Run a separate 1/2-inch ID gravity line from the brine tank overflow elbow to a floor drain. Never tie the brine tank overflow line directly into the high-pressure valve drain line. The overflow relies entirely on gravity; merging it with the pressurized valve drain can force backwash water backward into the salt tank.
- Conduct a Manual Regeneration Test: Restore the main water supply, return the bypass valve to service mode, and initiate a manual regeneration cycle on the control head. Watch the drain line closely for leaks, violent vibrations, or standing water near the air gap.
For homeowners comparing this drain-line work to a broader softener setup, the team’s guide on how to install a water softener in 6 simple steps explains where the drain connection fits into the complete installation sequence.

Best Practices and Mistakes to Avoid for Reliable Drainage
A high-performing water treatment system relies on regular flow dynamics and unobstructed discharge lines. Taking extra time to double-check fittings and pipe alignment avoids messy basement cleanups later. If you are dealing with unexplained drips or mystery moisture around your drain connections, prompt leak repair protects drywall, subfloors, and structural framing from mold and wood rot.
Common Mistakes to Avoid During Water Softener Drain Line Installation
Even experienced DIYers can overlook subtle plumbing rules. Here are the most common installation mistakes:
- Submerging the Drain Tube: Pushing a flexible hose deep into a standpipe or floor drain trap eliminates the air gap. If the sewer line backs up, contaminated water will get pulled directly into your water softener.
- Undersizing the Pipe: Using 3/8-inch tubing instead of standard 1/2-inch ID tubing restricts water flow, creates excessive back-pressure, and leaves brine sitting in the tank.
- Omitting a Dedicated P-Trap: Hard-plumbing a line into a waste stack without a trapped water seal allows hazardous methane and sewer gas into your basement.
- Using Consecutive Sanitary Tees: Stacking sanitary tees vertically or creating unvented junctions can siphon water seals dry, causing gurgling sounds and dry trap odor issues.
- Allowing the Line to Sag: Failing to support the discharge line every 4 feet creates low belly spots in the tubing that trap mineral slurry and debris.
Routine Maintenance and Line Inspection Routine
Keep your drainage running smoothly by adopting a simple maintenance routine. Check the discharge line every three months for physical wear, brittle plastic, loose hose clamps, or mineral scale buildup near the air gap. Once a year, remove the drain tubing, flush it with clean water to clear out fine sediment, and confirm that the air gap opening remains clear of lint and dust.
Routine care also protects the equipment beyond the drain tube itself. In the team’s article on the best maintenance services for your softener, Quality Comfort Pros explains how checking salt levels, clearing buildup, and watching for performance changes can help prevent avoidable water treatment problems.
Periodically inspect the brine tank to ensure salt bridges have not formed. Keeping salt levels consistent protects internal injectors from drawing excessive air or undissolved sludge. Professional drain cleaning can also clear underlying waste stack pipes before heavy backwash cycles stress older plumbing systems.
Professional vs. DIY Drain Line Setup
Running flexible tubing to a nearby laundry sink is a manageable weekend project for many homeowners. However, when an installation involves tapping into cast-iron sewer stacks, cutting into main vent lines, or navigating complex crawl spaces, professional plumbing expertise is invaluable.
When to Call a Licensed Plumbing Specialist
Reach out to a licensed professional if your installation requires:
- Cutting into existing drainage, waste, and vent (DWV) piping to add a new standpipe.
- Routing drain pipes through unheated crawl spaces that need freeze-proofing insulation or heat trace tape.
- Troubleshooting persistent valve errors, low pressure, or incomplete brine draw during cycles.
- Validating system warranties that require certified installation sign-offs.
Licensed plumbers have the tools and code expertise to complete complex installations safely. When your system shows signs of internal valve wear, low suction, or regeneration failure, experienced technicians can diagnose the issue and restore performance.
Frequently Asked Questions About Water Softener Drain Line Installation
What is the required air gap size for a water softener drain line?
Plumbing codes mandate a vertical air gap of at least 1.5 inches between the end of the discharge tube and the flood rim of the receiving drain. If your drain line diameter is larger than 3/4 inch, the air gap must be at least twice the diameter of the pipe.
Can a water softener drain line share a standpipe with a washing machine?
Yes, a water softener can share a 2-inch washing machine standpipe if you use a code-compliant dual-inlet air gap bracket. The bracket keeps the softener line firmly anchored above the washer discharge hose, preventing back-siphonage and ensuring neither appliance overwhelms the drain.
What is the maximum distance and height you can run a softener drain line?
Most residential softener manufacturers recommend a maximum horizontal run of 30 feet and a maximum vertical rise of 8 feet above the floor. Exceeding these limits creates excessive back-pressure that prevents the unit from drawing brine properly.
What size tubing is recommended for a softener discharge line?
The standard size for residential water softener drain lines is 1/2-inch inside diameter (ID) tubing or 1/2-inch Schedule 40 PVC. For longer runs approaching 30 feet or high-flow systems producing over 7 GPM, step up to 3/4-inch piping to minimize flow friction.
Where are the approved discharge locations for water softener backwash?
Approved locations include a dedicated 2-inch plumbing standpipe with a P-trap, a laundry utility sink, an open basement floor drain, or an interior sump pump pit fitted with a corrosion-resistant pump. All connection points require a code-compliant air gap.
Why is a P-trap required when hard-plumbing a water softener drain?
A P-trap holds a standing water seal that blocks sewer gases, methane, and bacteria from rising out of the municipal sewer or septic tank into your living spaces. Every hard-plumbed drain connection requires a trap and proper venting.
What happens if a water softener drain line freezes or clogs?
If the discharge line freezes or clogs, backwash water cannot escape during regeneration. The system may flood your basement floor, fill the brine tank with excess water, or foul the resin bed with trapped minerals, causing hard water to enter your home.
How often does a water softener discharge water through the drain line?
A typical residential water softener regenerates once every 3 to 7 days, depending on your household water usage and water hardness levels. Each regeneration cycle discharges roughly 30 to 80 gallons of water over a 90-minute period.
Can I run my water softener drain line into a sump pump basin?
Yes, you can route the discharge into a sump pit if you use a corrosion-resistant thermoplastic or stainless steel pump. Be sure to check local municipal regulations, as some areas restrict discharging salty softener brine into storm sewers or outdoor dry wells.
How do you prevent sewer gas from entering the house through the drain line?
To prevent sewer gas intrusion, connect the discharge line to a trapped and vented plumbing receptor, install a physical air gap fitting, and never seal a discharge line directly into a sewer pipe without a water trap barrier.
Conclusion
A clean, code-compliant water softener drain line installation protects your drinking water from contamination, shields your home from sewer gases, and ensures your treatment equipment runs efficiently year after year. By following standard guidelines for air gaps, pipe sizing, slope, and elevation limits, you can prevent water damage and keep your plumbing performing at its best.
At Quality Comfort Pros, we have served Gaylord, MI, and communities across Northern Michigan, including Petoskey, MI, Boyne City, MI, Charlevoix, MI, and Grayling, MI, for 28 years. As a family-owned team, we bring reliable, all-brand expertise to every heating, cooling, and plumbing project. If you need help with a drain line, want to upgrade your water treatment system, or need a complete plumbing inspection, contact our professional water softener technicians today for friendly, dependable service.